GraphQL 세번째 이야기
Resolver
데이터를 전달받을때 api의 데이터 전체를 가져오는게 아니라 데이터의 특정 정보만을 가져오고 싶을때, 즉 필터링이 필요할때 사용한다.
예를들어 저번일지에서 posts의 내용중에
module.exports = [
    {
        id: 'post1',
        title:'It is a first post',
        description:'It is a first post description',
        comments:[{
            id:'comment1',
            text:'It is a first comment',
            likes: 1
        }]
    },
    {
        id: 'post2',
        title:'It is a second post',
        description:'It is a second post description',
        comments:[]
    }
]
의 코드중에 first라는 내용이 들어간 데이터만 출력하고 싶다던가 comment중에 like가 1이상인 데이터만 출력하고 싶을때 사용한다.
그럼우선 코드를 작성해 보자
Server.js 파일의 내용이다.
const schema = makeExecutableSchema({
    typeDefs: loadedFiles,
    resolvers : {
        Query: {
            posts : async (parent, args, context, info) => {
                console.log("parent", parent)
                console.log("args", args)
                console.log("context", context)
                console.log("info", info)
                const porduct = await Promise.resolve(parent.posts);
                return porduct
            },
            comments : async (parent) => {
                const comment = await Promise.resolve(parent.comments);
                return comment;
            }
        }
    }
})
schema안에 resolvers를 추가한다.
server페이지여서 web에서 콘솔이 나오지 않고 터미널에 콘솔이 출력된다.
resolver에는 4자기 파라미터가 있다.
- Parent : 필드의 부모(즉, resolver 체린의 이전resolver)에 대한 resolver의 반환 값이다.
The return value of the resolver for this field's parent (i.e., the previous resolver in the resolver chain).For resolvers of top-level fields with no parent (such as fields of Query), this value is obtained from the rootValue function passed to Apollo Server's constructor.
상위값이 있을시 상위값이 지정되고 상위값이 없으면 rootValue가 자동으로 지정된다. - Args: 이 필드에 제동된 모든 GraphQL 인수를 포함하는 객체
An object that contains all GraphQL arguments provided for this field. For example, when executing query{ user(id: "4") }, the args object passed to the user resolver is { "id": "4" }.
해당필드에 쿼리 {user(id:"4")}를 실핼하면 인자의 개체는 {id:"4"}가 된다.
내가 작성한 코드를 예를 들면 postsID:4를 요청하면 args의 값은 {postsID:4}가 들어간다.
{
  posts (postsID:4) {
    id
    title
    description
    comments{
      id
      text
      likes
    }
  }
}- context: 특정 작업에 대해 실행 중인 모든 resolver 간에 공유되는 object이다.
인증정보, 데이터, 로더, 인스턴스 및 리졸버에서 추적할 기타 항목을 포함하여 작업별 상태를 공유하는데 사용한다.
아래의 이미지를 보면 context를 이용해서 인증처리를 한다. ADMIN이 아니면 에러메세지가 나오도록한다.
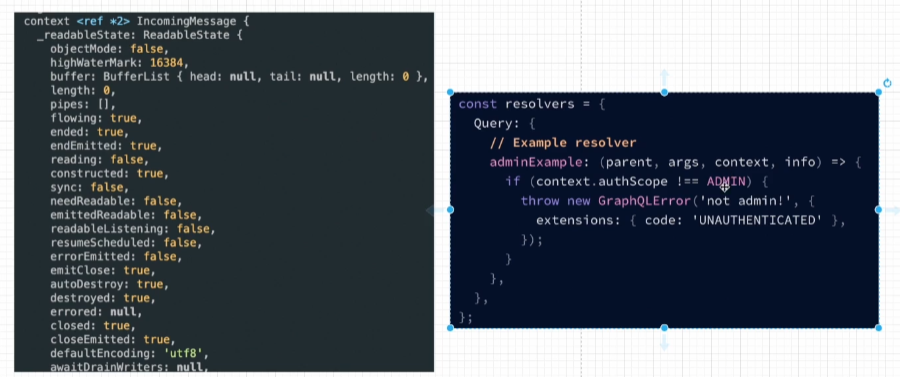
- context: 필드 이름, 루트에서 필드까지의 경로 등을 포함하여 작업의 실행 상태에 대한 정보를 포함한다.
비동기 처리하는 방식은 위에 코드를 보면 anyce await를 사용해서 작업을 하는데 anyce를 사용하면 Promis.resolve를 작성하지 않아도 자동으로 Promise처리가 된다.
모듈화
resolver도 저번에 작업했던 모듈화처럼 따로 코드를 빼서 선언해주려고 한다.
const loadedResolvers = loadFilesSync(path.join(__dirname, "**/*resolver.js"))

const schema = makeExecutableSchema({
    typeDefs: loadedFiles,
    resolvers : loadedResolvers
})
이번엔 path를 사용해서 절대경로로 경로를 지정한다.
module.exports = {
    Query: {
        comments: (parent) => {
            return parent.comments;
        }
    }
}
module.exports = {
Query: {
posts : (parent) => {
return parent.posts;
}
}
}server.js에 사용했던 코드를 comment, posts폴더에 각각 파일을 생성 후 작업하였다.
이렇게 코드를 따로 빼서 선언해준 이유는 필터링 기능을 작업하기 위해서이다.
일단 그러면 각각 model페이지를 먼저 수정해보자
Posts.model.js
const posts = [
    {
        id: 'post1',
        title:'It is a first post',
        description:'It is a first post description',
        comments:[{
            id:'comment1',
            text:'It is a first comment',
            likes: 1
        }]
    },
    {
        id: 'post2',
        title:'It is a second post',
        description:'It is a second post description',
        comments:[]
    }
]

function allPosts(){
    return posts
}

module.exports = {
    allPosts
}
Comment.model.js
const comments = [
    {
        id:'comment1',
        text:'It is a first comment',
        likes:1
    }
]

function allComments(){
    return comments
}

module.exports = {
    allComments
}
이런식으로 posts, comment를 변수로 지정하고 그걸 함수에 넣고 해당 함수를 내보낸다.
posts.resolver.js
const postsModel = require("./posts.model")

module.exports = {
    Query: {
        posts: () => {
            return postsModel.allPosts()
        }
    }
}
posts 페이지만 예시로 가져왔다. 이렇게 posts를 가져와 사용하면 된다.
그러면 parent를 사용하지 않고 posts를 가져올 수 있다.
server.js
const { loadFilesSync } = require('@graphql-tools/load-files');
const { makeExecutableSchema } = require('@graphql-tools/schema');
const express = require('express');
const { graphqlHTTP } = require('express-graphql');
const {buildSchema} = require('graphql')
const path = require('path');
const app = express();
const port = 4000;

const loadedFiles = loadFilesSync("**/*",{
    extensions:['graphql']
})

const loadedResolvers = loadFilesSync(path.join(__dirname, "**/*.resolvers.js"))

const schema = makeExecutableSchema({
    typeDefs: loadedFiles,
    resolvers : loadedResolvers
})

app.use('/graphql',graphqlHTTP({
    schema : schema,
    graphiql:true
}));

app.listen(port,() => {
    console.log(`Running a GraphQL API server at http://localhost:${port}/graphql`);
});
server.js에서 사용했던. root와 rootValue를 사용하지 않아도 데이터를 가져올 수 있다.
좋아요 3개 이상인 commnet만 출력 가능하도록 만들어보자 comment관련 파일들을 전부 수정해야 되는데 우선 Query부터 작업을 진행한다.
Comment.graphql
type Query{
    comments: [Comment]
    commentsByLikes(minLikes:Int!): [Comment]
}
type Comment{
    id: ID!,
    text:String!,
    likes:Int
}
commentsByLikes에 minLikes의 값을 받아 comment를 출력한다. minLikes는 숫자를 받고 필수 값이라 ! 붙여서 작성한다.
그리고 resolver에게 전달해준 model파일에 필터 함수를 작성해 보자
Comment.model
const comments = [
    {
        id:'comment1',
        text:'It is a first comment',
        likes:1
    },
    {
        id:'comment2',
        text:'It is a Second comment',
        likes:10
    }
]

function getCommentsByLikes(minLikes){
    return comments.filter(comment => {
        return comment.likes >= minLikes
    })
}

module.exports = {
    allComments,
    getCommentsByLikes
}
getCommentsByLikes라는 네이밍을 한후 minLikes의 값을 전달 받고 fillter를 사용해서 comment의 likes를 비교해서 minLikse보다 같거나 큰값들을 리턴 해서 보여주는 함수를 만들었다.
그리고 지금 comment 하나밖에 없기 때문에 comment를 하나더 만들어준다.
Comment.resolver
    Query: {
        comments: () => {
            return commentModel.allComments();
        },
        commentsByLikes: (_, args) => {
            return commentModel.getCommentsByLikes(args.minLikes)
        }
    }
comments 밑에 필터링 쿼리를 작성해주고 해당 작업에서는 parent는 사용하지 않아 _ 로 대체 했다.
위에 작성 했던 args를 사용해 minLikse값을 가져온다.
다시 서버를 실행 후 GraphiQl에 아래 코드처럼 요청을 보내면
{
  commentsByLikes(minLikes: 3) {
    id
    text
    likes
  }
}
{
"data": {
"commentsByLikes": [
{
"id": "comment2",
"text": "It is a Second comment",
"likes": 10
}
]
}
}결과값이 제대 출력되는걸 볼 수있다.
이제 postId로 포스트를 출력 하는 기능을 추가하면 필터링 기능은 끝이다.
Posts.graphql
type Query{
    posts:[Post],
    post (id:ID!) : Post
}

type Post{
    id: ID!,
    title: String!,
    description: String!,
    comments: [Comment]
}
Posts.model
const posts = [
    {
        id: 'post1',
        title:'It is a first post',
        description:'It is a first post description',
        comments:[{
            id:'comment1',
            text:'It is a first comment',
            likes: 1
        }]
    },
    {
        id: 'post2',
        title:'It is a second post',
        description:'It is a second post description',
        comments:[{
            id:'comment2',
            text:'It is a first comment',
            likes: 10
        }]
    }
]

function allPosts(){
    return posts
}

function getPostById(id){
    return posts.find(post => {
        return post.id === id
    });
}

module.exports = {
    allPosts,
    getPostById
}
Posts.resolvers
const postsModel = require("./posts.model")

module.exports = {
    Query: {
        posts: () => {
            return postsModel.allPosts()
        },
        post: (_, args) => {
            return postsModel.getPostById(args.id)
        }
    }
}
comment 가져오는 기능과 코드상으로는 차이가 없다 filter에서 find로 변경된 점만 다를 뿐
이걸로 이제 grapql부분은 끝난거 같다.
이제 graphql를 활용해 프로젝트를 하나 만들어보면 좀 더 심화 부분을 알 수 있을거 같다.
'공부일지 > React' 카테고리의 다른 글
| 비전공자의 공부일지 - GraphQL 두번째 이야기 (0) | 2023.05.22 |
|---|---|
| 비전공자의 공부일지 - GraphQL (0) | 2023.05.17 |
| 비전공자의 공부일지 - TypeScript (0) | 2023.05.11 |
| 비전공자의 공부일지 - NextJS (0) | 2023.05.11 |
| 비전공자의 공부일지 - Zustand 맛보기 (1) | 2023.05.10 |


